Pages
- A RULE-BASED TOPOLOGICAL MODELER GENERATOR
- Inference of topological operations: illustration in geology
- Japhy : une plate-forme mécanique et topologique utilisant un langage à base de règles pour l’animation physique.
- JerboaEclatement
- Joptop – Jerboa Optimisation Topologique
- Lesson 1: Discover topological structures of Jerboa
- Lesson 2: Discover embeddings and orbits
- Lesson 3: Modify and write a first rule
- Lesson 4: Write embedding expressions
- Lesson 5: Design topological transformations
- Lesson 6: Utilize the execution cycle of rules
- Lesson 7 : Write scripts in Jerboa
- Lesson 8: Create your own modeler
- Model reevaluation based on graph transformation rules
- Topological inference for subdivision schemes
You should now be able to write a good variety of rules so you’re going to learn how to string them together in a script. You will first learn how to call upon different rules in a script and then you will discover loops and alternatives in the Jerboa script language.
APPLYING RULES IN A SCRIPT
Here is the syntax to apply a rule: @rule<[NameOfTheRule]>([TopologicalHooks],[EmbeddingParameters]);
Now you will create a script which builds a cube from scratch.
- open the editor and create a new script (the script button is next to the rule button) called MyCube
You will notice that the layout is slightly different, there are no longer left and right patterns but only one window at the top in which you can write commands in the Jerboa script language.
You will start by creating a free dart which you will then extrude. To use the extrusion rules you will need to give the created dart as a parameter by making the result of the CreateFreeVertex rule a « JerboaRuleResult » and then giving the first dart of the JerboaRuleResult list as a parameter to the following rules.
- create a JerboaRuleResult called « res0 » (see Screen 7.1) and give it the result of CreateFreeVertex which will have two parameters (a new instance of Points and the « false » boolean to indicate that it should not ask the user for coordinates, remember that from the last lesson)

You will now use vectors of the « Vectors.java » class which must be imported in the « Header » window under « Views » using these lines:
@header(java){
import jerboatutorial1.Vectors;
}
(see Screen 7.2)

You can use the Vectors constructor « public Vectors(float x, float y, float z) » to create the parameters for the extrusion rules.
- extrude the dart to create an edge
- extrude the edge to create a square face
- extrude the face to create a cubic volume
- create a second JerboaRuleResult called res1 which will be the result of the last operation
- return res1
To keep things simple, make sure to extrude with a vector along all three different axes (x, y and z).
Save, export and try your script by double clicking on it in the editor without having selected any darts.
LOOPS IN A SCRIPT
There are different loops you can use in scripts, these are the main java loops (for, foreach, switch/case, while, etc.) just like in rules.
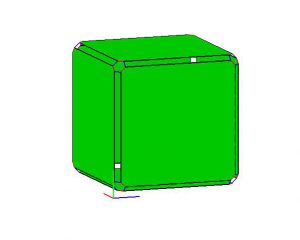
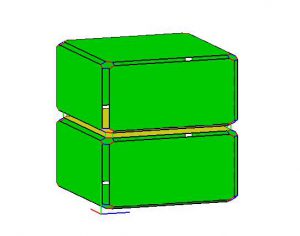
You will create a script which cuts a volume in two.
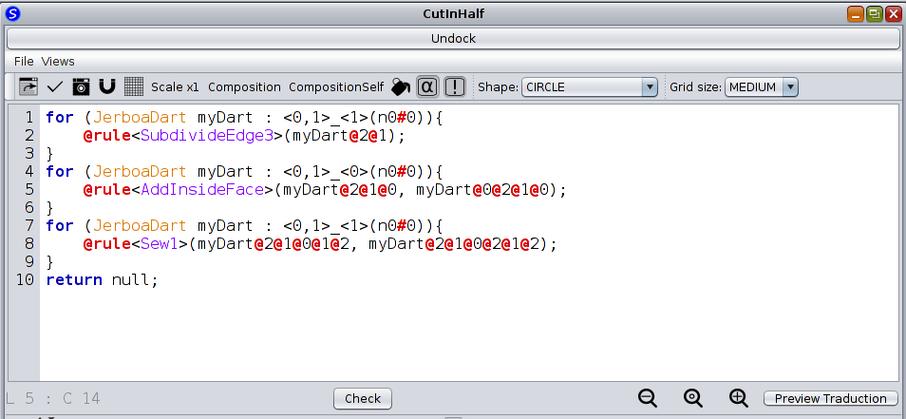
- open the editor and create a new script called « CutInHalf » (see Screen 7.4)
- open the « graphs » window at the bottom of the screen and place a node in the left pattern and make it a hook (see Screen 7.3)

- create a loop on one dart of each vertex (1) of a face (0,1) starting from the hook (n0#0)
- place the SubdivideEdge3 rule in that loop, the dart to which this rule must be applied is reached through 2-links and then 1-links from each dart on which the rule is looped
You may also remember from the same lesson that accessing a neighboring dart through an n-link is done using the « @n » syntax.for ( [type] [variable] : [condition] ) { [instruction]
};
- create a loop on one dart of each edge (0) of a face (0,1) starting from the hook (n0#0)
- place the « AddInsideEdge » rule in that loop, the first dart to which this rule must be applied are reached through 2-links, then 1-links, then 0-links from each dart on which the rule is looped, the second is reached through 0,2,1 and 0-links
The AddInsideEdge rule is provided to you and you can discover it in the editor.
- create a loop on one dart of each vertex (1) of a face (0,1) starting from the hook (n0#0)
- place the Sew1 rule in that loop, the first dart to which this rule must be applied are reached through 2-links, then 1-links, then 0-links, then 1-links, then 2-links from each dart on which the rule is looped, the second is reached through 2,1,0,2,1 and 2-links
- return null because this script doesn’t need to return anything
- try your new script on the cube you created with the previous script
ALTERNATIVES IN A SCRIPT
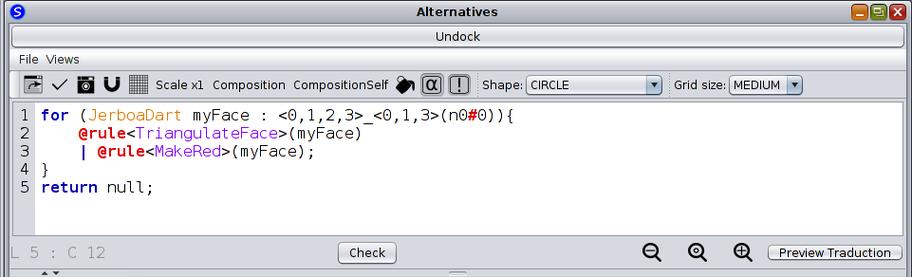
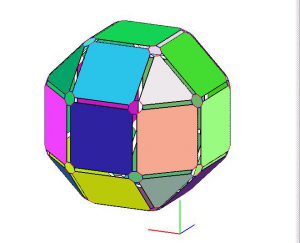
You will create a script which sweeps an object and applies either of two rules depending on the shape of each face. You will use the precondition of TriangulateFace to triangulate only the non triangular faces, if the precondition is not met (if the face is a triangle) then (and only then) the following rule will be applied, this is done by separating the rules by a « | ».
- open the editor and create a new rule called « Alternatives » (see Screen 7.7)
- go to the graphs window and create a hook like in the previous script
- place the TriangulateFace and MakeRed rules in a loop on each face (0,1,3) of the connected component (0,1,2,3) staring from the hook (n0#0)
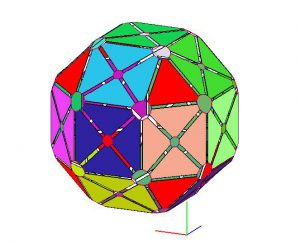
- try the rule on the IcositeHexagon which has square and triangular faces
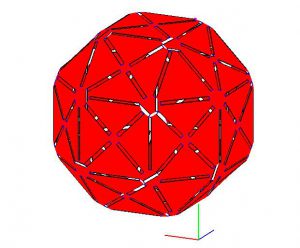
- apply the rule a second time
What have you learned?
- What type of loop did you use in the CutInHalf script?
- Why does every face turn red the second time you apply the Alternatives script to any object?
- Which rules (which you have written) could you use in the MyCube script to reduce the number of extrusions necessary?