Pages
- A RULE-BASED TOPOLOGICAL MODELER GENERATOR
- Inference of topological operations: illustration in geology
- Japhy : une plate-forme mécanique et topologique utilisant un langage à base de règles pour l’animation physique.
- JerboaEclatement
- Joptop – Jerboa Optimisation Topologique
- Lesson 1: Discover topological structures of Jerboa
- Lesson 2: Discover embeddings and orbits
- Lesson 3: Modify and write a first rule
- Lesson 4: Write embedding expressions
- Lesson 5: Design topological transformations
- Lesson 6: Utilize the execution cycle of rules
- Lesson 7 : Write scripts in Jerboa
- Lesson 8: Create your own modeler
- Model reevaluation based on graph transformation rules
- Topological inference for subdivision schemes
In this lesson you will learn which steps take place in the execution cycle of a rule. You will learn how to optimize the operations, set preconditions to a rule as well as parameters.
You will discover and use the Precondition, Midprocess and Postprocess in the editor of the modeler you have been using until now.
Here is a diagram of the execution cycle (see Figure 6.1).

PRECONDITIONS
There are three types of precondition: – preprocesses which are executed before the pattern matching which allow the rule to check conditions on the hooked darts. – node preconditions which are verified during the pattern matching process on each matched dart. – rule preconditions which is checked on the whole left pattern after having been matched. Darts are accessed with « @leftPattern#ni#j » where ni is the name of the node in the left pattern and j is the number of the instance of the node which is the dart you wish to access.
Here you will add a precondition to the triangulate rule from lesson 5 so that it can’t be applied to a triangle and then another one so that it can’t be applied to a blue face.
- open the editor and edit the TriangulateFace rule
- click on « Views » then on « Precondition »
- In the precondition window at the bottom write the expression to prevent the rule from being applied to a triangle by returning a boolean on whether the size of the collection of the edge sub-orbit on a face (the <0,3> sub-orbit from the <0,1,3> orbit) is equal to three (three edges to a triangle) like in Screen 6.2

EMBEDDING PARAMETERS
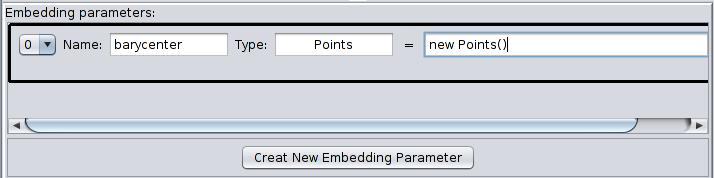
To create a variable you must click on « Create New Embedding Parameter », give it a name, a type and a default value.
You will now create a rule which places a hole in the center of a face. The hole will be the same shape as the face so each vertex of the hole will be placed halfway between it’s counterpart on the edge of the face and the barycenter of the face. This barycenter will be the same for each vertex so you only want to calculate it once so you should do it with an embedding parameter in the midprocess.
- open the editor and create a new rule called « PerforateFace »
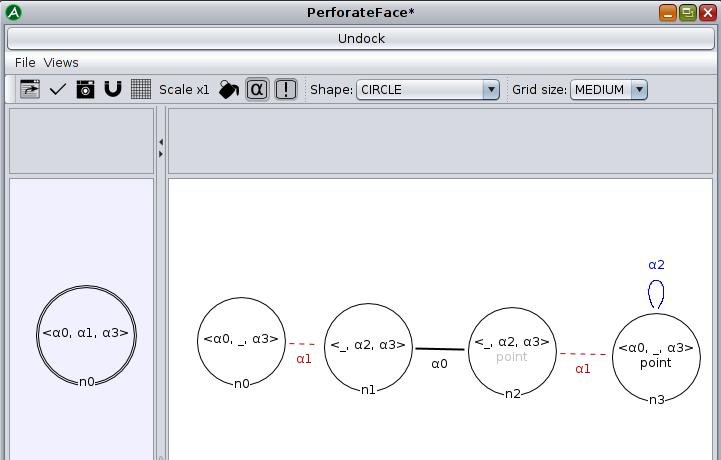
- place a hook in the left pattern like in Screen 6.3
- place four nodes in the right pattern like in Screen 6.3
- click on « Views », then « Embedding Parameters » and then « Create New Embedding Parameter » to create a variable called barycenter of the type Points (see screen 6.4)
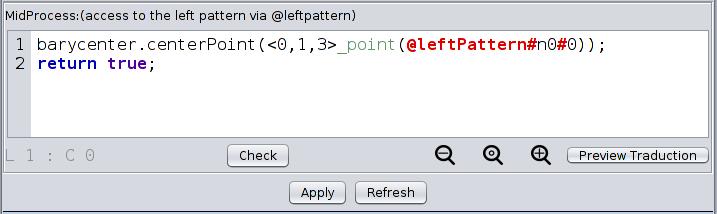
THE MIDPROCESS
It is therefor advantageous and sometimes necessary to put certain operations in the midprocess which must only be executed once or which are needed for the execution of embedding expressions. The latter case requires information to be passed from the midprocess to the embedding expressions in the form of embedding parameters which are variables you must declare in the « Embedding Parameters » window before using them in the midprocess and then the embedding expressions.
- go back to « Views » and select « Midprocess » (see Screen 6.5)
- use the centerPoint() method from Points to assign the center of the face to the barycenter variable
- return true to let Jerboa know that the midprocess is being successfully used
- Apply
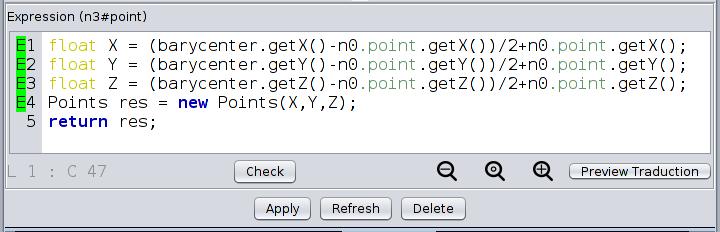
- edit the point embedding of the n3 node in the right pattern (see Screen 6.6)
- calculate a point between the dart point of the face and the barycenter of the face and return it
- Apply
- Save, export and try your new rule on any face of any object
THE POSTPROCESS
You will write a rule which creates a new vertex after having asked the user of the rule which coordinates the point of the vertex must have. For this you will need to create the variables in the Embedding Parameters, set the variables using a pop up window and then create the darts with those variables.
There is a method in the « Points » java class called « public static Points askForCoords() » which creates input dialog boxes asking for each coordinate of the point and returns an instance of Points.
- open the editor and create a new rule called “CreateFreeVertex”
- create a free node in the right pattern
- right click on the node four times to place the four loops (see Screen 6.7)
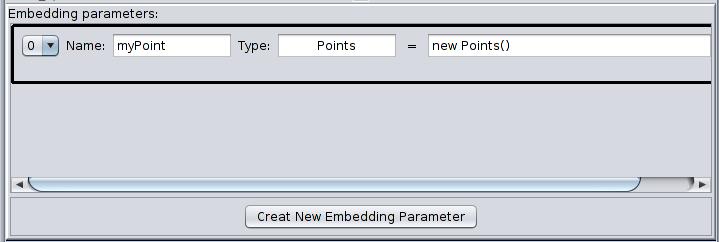
- create a variable for the input point (see Screen 6.8)
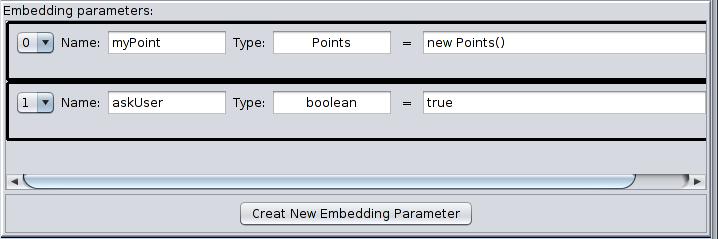
- click on « Views » then on « Embedding Parameters »
- click on « Create New Embedding Parameter »
- give it a name (for example: myPoint)
- the type is « Points » and it needs a default value which is provided by the new Points() constructor
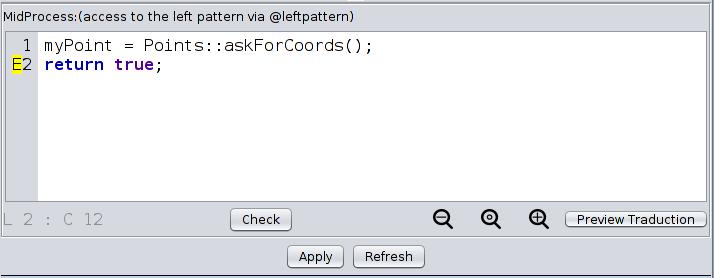
- write the midprocess (see Screen 6.9)
- click on « Views » then on « Midprocess »
- use the « askForCoords() » method from « Points » to assign a value to « myPoint »
- add a « return true; » statement
- Apply
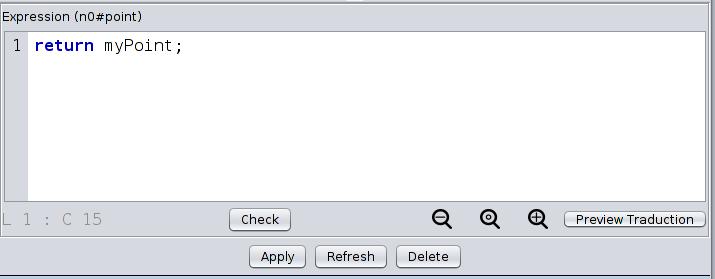
- write the point embedding expression (see Screen 6.10)
- edit the point embedding of the node in the right pattern
- return myPoint
- Apply
- save and export then try your new rule (this rule needs to be applied without selecting any darts) and check that it’s position is correct
- try the rule twice to see whether the values are kept from one application to the next as default values
You will now modify your CreateFreeVertex rule so that it can be applied without showing the pop up window every time (for example: in s script like you will learn in the next lesson). To do so you will just need to create a boolean which determines whether to ask for the coordinates or not, this boolean can have true as a default value and be set to false by the script but then it must be reset to true at the end of the operation so that next time you want to use it, you will be able to input the coordinates.
- open the editor and edit the CreateFreeVertex rule
- in the embedding parameters, add a variable called « askUser » of the type boolean and set it to true (see Screen 6.11)
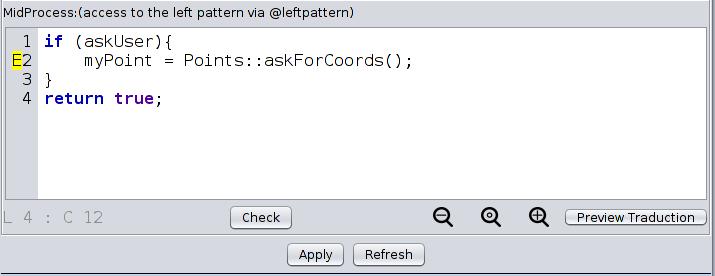
- in the midprocess add an « if » statement wherein the condition is askUser and the instruction is the assignment of myPoint using askForCoords (see Screen 6.12)
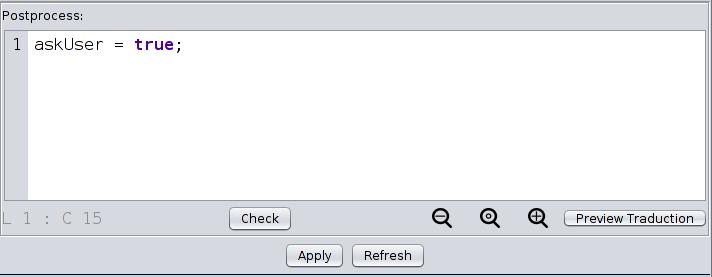
- now go to Views and open the « Postprocess » and set askUser to true, this means that the last thing this operation does is set the boolean to true in case it has been set to false (see Screen 6.13)
- Apply, save and export then try the operation, it should work just as it did before but now you will be able to use it in a script in the next lesson without having the input dialog popping up
What have you learned ?
- What type of precondition can you use to sew two faces together only if they are the same color?
- How many times is the midprocess executed when a rule is applied?
- How many times is an embedding expression executed when a rule is applied?